The first step to making our blog will be to create a new site with Wagon. But, let's hold off on that for a moment and briefly explore the wagon command line utility.
The help command
Since I would like to make my blog's design responsive, and I'm generally not so good with designing anyway, I plan on using Twitter Bootstrap to help out on the frontend side of things. Fortunately, Wagon comes with some built-in templates for Twitter Bootstrap. We can view Wagon's available templates by using the wagon list_templates command.
$ wagon list_templates
blank - A blank LocomotiveCMS site with the minimal files.
bootstrap2 - A LocomotiveCMS site with Twitter Bootstrap (v2.3.2) and Font Awesome (v3.2.1).
bootstrap3 - A LocomotiveCMS site powered by Twitter bootstrap (v3.0.0).
foundation - A LocomotiveCMS site powered by Foundation (v4.3.2).
unzip - Unzip a local or remote (http, https, ftp) zipped LocomotiveCMS site.
As you can see, Wagon comes with several built-in templates, including ones for Bootstrap 2 and Bootstrap 3. Great!
wagon list_templates is a handy command and Wagon comes with quite a few more commands, but you don't need to memorize all of them if you can remember just this one: wagon help. Let's run that one.
$ wagon help
wagon clone NAME HOST [PATH]  # Clone a remote LocomotiveCMS site
wagon destroy ENV [PATH]      # Destroy a remote LocomotiveCMS engine
wagon generate TYPE ...ARGS   # Generate resources (content_types, page, snippets) for a LocomotiveCMS site
wagon help [COMMAND]          # Describe available commands or one specific command
wagon init NAME [PATH]        # Create a brand new LocomotiveCMS site
wagon list_templates          # List all the templates to create either a site or a content type
wagon pull ENV [PATH]         # Pull a site from a remote LocomotiveCMS engine
wagon push ENV [PATH]         # Push a site to a remote LocomotiveCMS engine
wagon serve [PATH]            # Serve a LocomotiveCMS site from the file system
wagon version                 # Version of the LocomotiveCMS wagon
And, voilà! Here's a list of Wagon's commands and what they do. Let's try another command, wagon version.
$ wagon version
1.5.1
As advertised, this prints out what version of Wagon you have. At the time of writing, the latest version of Wagon was 1.5.1, but you can check for the current latest version on RubyGems.org. If you don't have the latest version, you might want to upgrade your gems using gem update.
Creating a new Wagon project
Let's create a new Wagon site for your project. According to wagon help, running wagon init creates a new site, but how do we use the Bootstrap template?
$ wagon help init
Usage:
  wagon init NAME [PATH]

Options:
  -t, [--template=TEMPLATE]  # instead of building from a blank site, you can have a pre-fetched site with form a template (see the templates command)
                             # Default: blank
  -v, [--verbose]            # display the full error stack trace if an error occurs

Create a brand new LocomotiveCMS site
Question answered. As wagon help init points outs, we need to use the --template option to specify a template. I won't need IE 6 or 7 support, so I'm going to go with Bootstrap 3.
Also, we need a name for the site. This is a travel blog, so I'm going to name it Wisdom for Wanderers. However, for the wagon command I will use an underscored version of this, wisdom_for_wanderers. We could have a spaced name (if we were careful to quote it when running the command), but I don't like spaces in my folder names.
Let's run the wagon init command.
$ wagon init wisdom_for_wanderers --template=bootstrap3
  create  wisdom_for_wanderers
  create  wisdom_for_wanderers/Gemfile
  create  wisdom_for_wanderers/app/content_types
  create  wisdom_for_wanderers/app/views/pages/404.liquid
  create  wisdom_for_wanderers/app/views/pages/404.liquid.haml
  create  wisdom_for_wanderers/app/views/pages/index.liquid
  create  wisdom_for_wanderers/app/views/pages/index.liquid.haml
  create  wisdom_for_wanderers/app/views/snippets/footer.liquid
  create  wisdom_for_wanderers/app/views/snippets/footer.liquid.haml
  create  wisdom_for_wanderers/config.ru
  create  wisdom_for_wanderers/config/deploy.yml
  create  wisdom_for_wanderers/config/site.yml
  create  wisdom_for_wanderers/config/translations.yml
  create  wisdom_for_wanderers/data
  create  wisdom_for_wanderers/public/fonts/glyphicons-halflings-regular.eot
  create  wisdom_for_wanderers/public/fonts/glyphicons-halflings-regular.svg
  create  wisdom_for_wanderers/public/fonts/glyphicons-halflings-regular.ttf
  create  wisdom_for_wanderers/public/fonts/glyphicons-halflings-regular.woff
  create  wisdom_for_wanderers/public/javascripts/bootstrap.js
  create  wisdom_for_wanderers/public/javascripts/bootstrap.min.js
  create  wisdom_for_wanderers/public/samples/apple-touch-icon-114-precomposed.png
  create  wisdom_for_wanderers/public/samples/apple-touch-icon-144-precomposed.png
  create  wisdom_for_wanderers/public/samples/apple-touch-icon-57-precomposed.png
  create  wisdom_for_wanderers/public/samples/apple-touch-icon-72-precomposed.png
  create  wisdom_for_wanderers/public/samples/favicon.png
  create  wisdom_for_wanderers/public/stylesheets/bootstrap-theme.css
  create  wisdom_for_wanderers/public/stylesheets/bootstrap-theme.min.css
  create  wisdom_for_wanderers/public/stylesheets/bootstrap.css
  create  wisdom_for_wanderers/public/stylesheets/bootstrap.min.css
Do you prefer HAML templates ?
The commanded prints out each file it creates and then asks whether you would like to use HAML Templates. I tend to think stuff like HAML is pretty cool, but to make this tutorial as accessible as possible I'm going to use HTML templates. Those following along at home whom would like to use HAML can do so by typing yes. Everyone else, let's type no and continue.
Do you prefer HAML templates ? no
    remove  wisdom_for_wanderers/app/views/pages/index.liquid.haml
    remove  wisdom_for_wanderers/app/views/pages/404.liquid.haml
    remove  wisdom_for_wanderers/app/views/snippets/footer.liquid.haml
Congratulations, your site "wisdom_for_wanderers" has been created successfully !
Next steps:
    cd ./wisdom_for_wanderers
    bundle install
    bundle exec wagon serve
    open http://0.0.0.0:3333
The wagon command prints a congratulatory message to indicate that our site was successfully created. It also provides the next steps. Start by changing into the newly created project directory.
$ cd wisdom_for_wanders
Then run bundle install, which will install Wagon's gem dependencies.
$ bundle install
Fetching gem metadata from https://rubygems.org/........
Fetching gem metadata from https://rubygems.org/..
Resolving dependencies...
Using RedCloth (4.2.9)
Using i18n (0.6.5)
Using multi_json (1.2.0)
Using activesupport (3.2.15)
Using coderay (1.1.0)
Using erubis (2.7.0)
Using better_errors (1.0.1)
Using chronic (0.9.1)
Using chunky_png (1.2.9)
Using coffee-script-source (1.6.3)
Using execjs (2.0.2)
Using coffee-script (2.2.0)
Using colorize (0.5.8)
Using commonjs (0.2.7)
Using fssm (0.2.10)
Using sass (3.2.12)
Using compass (0.12.2)
Using daemons (1.1.9)
Using rack (1.5.2)
Using dragonfly (0.9.15)
Using eventmachine (1.0.3)
Using faker (0.9.5)
Installing ffi (1.9.3)
Using tilt (1.3.3)
Using haml (4.0.3)
Using hike (1.2.3)
Using json (1.8.1)
Using multi_xml (0.5.5)
Using httparty (0.12.0)
Using multipart-post (1.2.0)
Using httmultiparty (0.3.10)
Using less (2.2.2)
Using libv8 (3.16.14.3)
Using listen (0.7.3)
Using locomotivecms-liquid (2.6.0)
Using locomotivecms-solid (0.2.2.1)
Using logger (1.2.8)
Using mime-types (1.25)
Using sprockets (2.10.0)
Using sprockets-sass (1.0.2)
Using stringex (1.4.0)
Using tzinfo (1.0.1)
Using zip (2.0.2)
Using locomotivecms_mounter (1.3.1)
Using rack-cache (1.2)
Using redcarpet (3.0.0)
Using thin (1.5.1)
Using thor (0.18.1)
Using will_paginate (3.0.5)
Using locomotivecms_wagon (1.3.1)
Using rb-fsevent (0.9.3)
Using rb-inotify (0.9.2)
Using ref (1.0.5)
Using therubyracer (0.12.0)
Using wdm (0.1.0)
Using bundler (1.3.5)
Your bundle is complete!
Use `bundle show [gemname]` to see where a bundled gem is installed.
The bundle install command is very informative and it prints out the name of every ruby gem it installs. Let's test that everything is working by running Wagon's built-in web server. Use the bundle exec wagon serve command to start the server.
$ bundle exec wagon serve
>> Thin web server (v1.5.1 codename Straight Razor)
>> Maximum connections set to 1024
>> Listening on 0.0.0.0:3333, CTRL+C to stop
What's this bundle exec business?
Here's the short version: bundler is a tool that lets us keep gem dependencies for different projects separate. The bundle install command doesn't install those gems globally. It installs them just for this project. That way if for some reason later you have a different ruby project that requires different versions of the same gems, each project has its own versions.
So, to make sure that we are running this project's version of a gem, we must put bundle exec before all Wagon commands. Actually, it's not required for all commands, but it's just simpler to always add it.
The command line is now unresponsive. That's because the web server is running in this shell. We can't run any commands in this shell so long as the web server is running. You can quit the web server at any time by pressing ctrl + c. For now, leave it running.
Open http://0.0.0.0:3333 in a web browser. It should look like the screenshot below, since we're just using the standard Bootstrap 3 template.
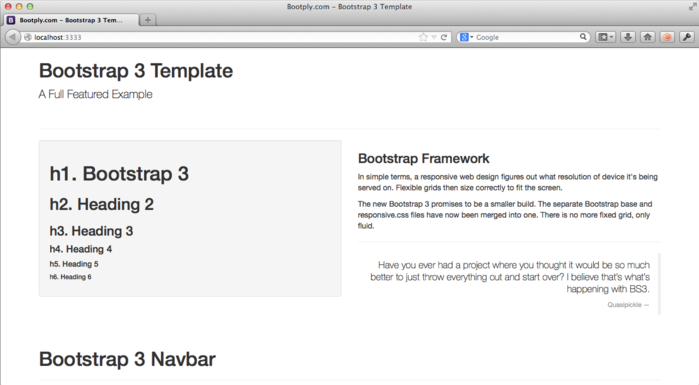
Success! Our newly created site is working just dandy.
Exploring the project directory
We've hardly done any work yet, but there sure are a lot of files and directories in our site's project folder. As we develop our blog, we will more learn more about these files and directories, but let's make a quick overview so this mess of files is less intimidating. If something doesn't make sense, don't worry: we'll be coming back to the important stuff later.
wisdom_for_wanderers
├── Gemfile
├── Gemfile.lock
Gemfile is used by bundler to determine what Ruby gems are needed for this project. Gemfile.lock is created when you run bundle install to note which exact versions of each gem have been installed. You'll never need to change or worry about either file, hurray!
├── app
│   ├── content_types
│   └── views
│       ├── pages
│       │   ├── 404.liquid
│       │   └── index.liquid
│       └── snippets
│           └── footer.liquid
The app folder holds several directories that make up the core of your site.
The content_types directory is for YAML files that define the structure of content types.
The app/views/pages directory is for liquid templates representing the site's pages. The Bootstrap template we used preloaded the site with an index page and a 404 page.
The app/views/snippets folder holds liquid markup files for reuse in templates. In other frameworks these are sometimes called partials. The Bootstrap template preloaded the site with a footer snippet, footer.liquid.
├── config
│   ├── deploy.yml
│   ├── site.yml
│   └── translations.yml
The config directly holds various configuration files. deploy.yml sets the connection details for LocomotiveCMS Engines we can deploy this site to. site.yml sets some general settings for the site. translations.yml defines localization strings.
├── config.ru
config.ru is used by Wagon web server. You'll never need to change or worry about this one either, hurray!
├── data
The data directory is for YAML files defining content entries for the site's content types.
├── log
│   └── wagon.log
The wagon.log file contains error messages which can useful when debugging.
└── public
    ├── fonts
    │   ├── glyphicons-halflings-regular.eot
    │   ├── glyphicons-halflings-regular.svg
    │   ├── glyphicons-halflings-regular.ttf
    │   └── glyphicons-halflings-regular.woff
    ├── javascripts
    │   ├── bootstrap.js
    │   └── bootstrap.min.js
    ├── samples
    │   ├── apple-touch-icon-114x114-precomposed.png
    │   ├── apple-touch-icon-144x144-precomposed.png
    │   ├── apple-touch-icon-72x72-precomposed.png
    │   ├── apple-touch-icon-precomposed.png
    │   ├── favicon.png
    │   └── pages
    └── stylesheets
        ├── bootstrap-theme.css
        ├── bootstrap-theme.min.css
        ├── bootstrap.css
        └── bootstrap.min.css
The public directory holds all of our site's assets: fonts, javascripts, images, and stylesheets. The public/samples directory is for images. That name probablys seems unintuitive now, but it will make more sense later. As you can see, the Bootstrap template has preloaded the site with some various stylesheets, javascripts, images, and fonts.
Hopefully, the project directory is now a little less opaque.
Setting up git
A final and optional step to creating our Wagon site is to setup some kind of source versioning system. This tutorial is going to use git, because it's the versioning system de jour. You are of course welcome to use Subversion, Mecurial, or any other system you like.
If you don't have previous experience with a source control system, you can skip this step. If you're interesting in learning about source versioning, I would encourage you to checkout git (excuse the pun).
Open a command line, navigate to the project directory, and run git init.
$ git init
Initialized empty Git repository in /Users/me/source/wisdom_for_wanderers/.git/
Next, create a .gitignore file in the project directory and fill it in with the following contents.
/.bundle
/config/deploy.yml
/log
The files listed will be ignored by git and never saved to our repository. The .bundle and log directories just contain logs that shouldn't be in the source repository. And deploy.yml will enventually contain passwords or API keys, so it's important we never accidentally commit that kind of sensitive information.
.DS_STORE to it.Add all of the files in this directory to the repo using git add and commit everything.
$ git add .
$ git commit -m "initial commit"
Done! We've successfully created a new Wagon site. So far it's just a dummy site, but it's created and we've setup git, so we're ready to start developing.
Next: configuring the site