More often than not, you will want your site's content to be editable not just by developers, but by copy writers or others that do not necessarily have any knowledge of HTML, let alone of using the Wagon command line tool.
But currently, changing our blog's copy requires editing Liquid template files. In this chapter we will remedy this by using editable elements, which allow you to make portions of a page editable through the LocomotiveCMS back-office.
editable_text
To start, let's make the two paragraphs of text on the About page editable. Open app/views/pages/about.liquid and replace the two paragraphs of text with the code shown below.
{% editable_text "about_body", rows: 20 %}
    <p>
      Thanks for visiting Wisdom for Wanders!
      This blog aims to introduce readers to cool things to see, eat, and do all over the world. And along the way, I'll share some handy travel tips that can make wandering the globe easier and more fun than ever.
      The blog tends to focus on sights and places a little off the tourist trail, so unadventurous beware.
    </p>
    <p>
      I hope you enjoy the site and bon voyage!
    </p>
{% endeditable_text %}
The editable_text tag makes a block of text editable through the back-office. The tag can take various options, but here we just use one: rows. This option specifies the height of the text area for this element in the back-office. The default value is 10, but this is a big chunk of text so I decided to bump it up to 20.
We've put the text that was previously on the page between the opening and closing editable_text tags. Text between these tags is the default text that shows up when testing the site with the Wagon web server. Further, the first time an editable text element is pushed to an Engine, this text will be used to populate the element in the back-office.
If you pull up the page in the Wagon web browser, everything should look just as it did before.
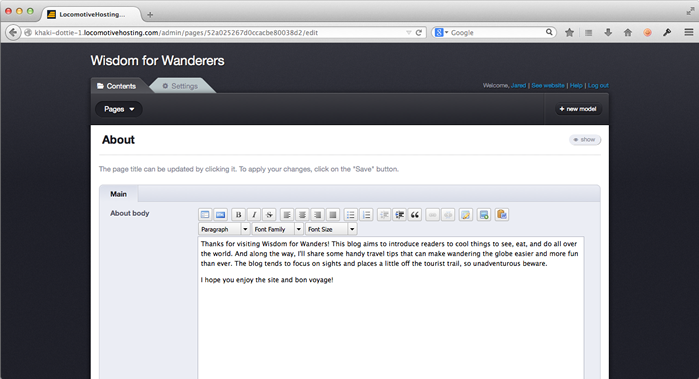
Of course the whole point of editable elements is that site editors can edit them. However, we're going to stay focused and just continue dealing with the Wagon side of things for now. However, when we do publish this site to an engine, this text will be editable with a user friendly text editor with our content, like the one show below.
Capture, format, hints, and blocks
Let's make more of the About page's content editable. Remove the <div> tag holding the photo and replace it with the code below.
{% block 'featured_photo' %}
    {% capture caption %}
      {% editable_text "caption", format: "raw", rows: 3, hint: "Text displayed below the photo and in the ALT attribute." %}
        Gyeongbokgung, Seoul
      {% endeditable_text %}
    {% endcapture %}
    <div class="img-box">
      <a href="{{ 'gyeongbokgung-full.jpg' | theme_image_url | resize: '800x' }}">
        <img src="{{ 'gyeongbokgung-full.jpg' | theme_image_url | resize: '400x'  }}" alt="{{ caption }}" />
      </a>
      <p>{{ caption }}</p>
    </div>
{% endblock %}
So, quite a few changes. Let's skip the block tag for now and move onto the capture tag. Liquid comes with two ways of assigning variables: assign and capture.
For simple assignments, use assign.
{% assign my_name = "George" %}
The other way, capture, allows you to assign everything between the opening and closing tags to a variable.
{% capture my_bio %}

  George Stephenson (9 June 1781 – 12 August 1848) was an English civil engineer and mechanical engineer who built the first public inter-city railway line in the world to use steam locomotives, the Liverpool and Manchester Railway which opened in 1830. Renowned as the "Father of Railways", the Victorians considered him a great example of diligent application and thirst for improvement, with self-help advocate Samuel Smiles particularly praising his achievements.


  His rail gauge of 4 feet 8 1⁄2 inches (1,435 mm), sometimes called "Stephenson gauge", is the world's standard gauge.

{% endcapture %}
We can now access these values with the variables my_name and my_bio.
In the code above, we assign what's between the tags to the variable caption, which we use later below the image and in the image's alt attribute. Inside the capture tag there is another editable text element. It looks about the same as the one we used for the page's body, but it has two new attributes.
The format attribute is set to html by default, but also accepts the value raw, as used here. Instead of the rich text editor we saw before, raw editable elements present only a plain text field in the back-office. Raw fields accept only plain text; any HTML entered will be converted to HTML entities and rendered literally. In this case, I don't want the site editors getting fancy with the captions, so I've chosen raw instead of html.
The other new attribute is hint. The value of hint is displayed in the back-office below the field to give editors guidance on how to use the field.
How these editable fields would look to a site editor is shown with in the screenshot below.
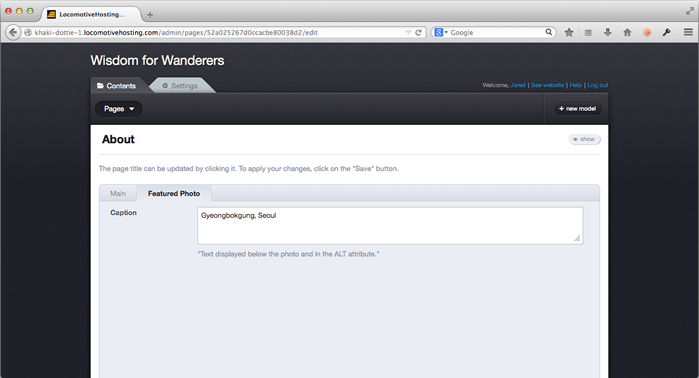
You might notice from the screenshot that these editable elements have been put under a separate tab from the About Body element. These elements are diplayed under the Featured Image tab because these were in the Featured Image block. In addition to their function of allowing child templates to overwrite portions of parent templates, blocks can be used to organize editable elements into tabs in the back-office, as we have done here.
Also note that because we specified the caption element's format as raw, only a plain text area is shown, instead of the rich text editor used for the About Body element. And finally, the hint we added can be seen just below the text area.
Editable file
The last step to making our page fully editable through the back-office is to make the photo editable.
Since the photo on the page will no longer be a static, let's move the gyeongbokgung-full.jpg file out of the public/images folder. Create a new folder, public/samples/pages and move gyeongbokgung-full.jpg into the directory. Generally, the public/images directory is used for static images that are part of site's design, whereas the public/samples directory is used for dynamic images belonging to editable elements or content types.
Next, delete the featured_photo block from your about.liquid file and replace it with the new code below.
{% block 'featured_photo' %}
  {% capture caption %}
    {% editable_text "caption", format: "raw", rows: 3, hint: "Text displayed below the photo and in the ALT attribute." %}
      Gyeongbokgung, Seoul
    {% endeditable_text %}
  {% endcapture %}
  {% capture photo %}{% editable_file "photo" %}/samples/pages/gyeongbokgung-full.jpg{% endeditable_file %}{% endcapture %}
  <div class="img-box">
    <a href="{{ photo | resize: '800x' }}">
      <img src="{{ photo | resize: '400x' }}" alt="{{ caption }}" />
    </a>
    <p>{{ caption }}</p>
  </div>
{% endblock %}
As before, a capture tag is used to assign the editable element to a variable that we can use it twice: once for the 400 pixel wide version and once for the enlarged version.
Instead of an editable_text tag, this time we used an editable_file tag identified by the slug photo. Like editable text elements, the default value goes between the opening and closing tags. In this case, we're using the gyeongbokgung-full.jpg file we moved into the samples directory as the default file.
Did you notice the spacing? Usually, I put the content of Liquid tags onto a new indented line, but since Liquid Markup doesn't control spacing, we need to be careful about the spacing here. If I had specified the editable file like so:
{% capture photo %}
  {% editable_file "photo" %}
    /samples/pages/gyeongbokgung-full.jpg
  {% endeditable_file %}
{% endcapture %}
The default value would be \n\t\n\t\t/samples/pages/gyeongbokgung-full.jpg
\n\t\n (where \n and \t represent new lines and tabs, respectively). To prevent those tabs and new lines from ending up in our file path, we need to put the Liquid Markup on a single line.
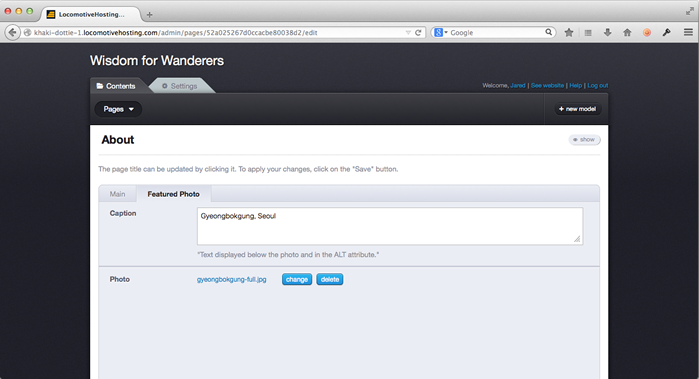
A preview of what the back-office file uploader for the new editable file element is shown below.
Header properties for editable elements
The about page is now fully editable, so I'm pretty satisfied, but there's one more thing regarding editable elements I would like to touch on briefly. When we generated the about.liquid file, a commented-out editable_elements property was put in the header automatically.
# editable_elements:
# 'some_block/some_slug': "<text>"
# 'some_block/some_slug': "<relative path to the file under the public/samples folder>"
You can use this property to populate editable elements with data. We could for example have added something like this in the about.liquid header:
editable_elements:
  'main/about_body': "<p>Thanks for visiting Wisdom for Wanders! This..."
This would be a nice alternative to putting the default text in the page, but there's one problem. Due to a currently open bug, any text in the editable_elements header will overwrite editable elements values in the back-office. So if we ran wagon push, changed the content in the back-office, then ran wagon push again, our back-office changes would be overridden by these header values.
Ideally, you would be able to choose when you wanted back-office edits to be overwritten, and hopefully we finish a fix for that soon and this will be yet another nice feature of LocomotiveCMS. In the meantime, let's delete the commented out editable elements header from the file so we don't accidentally delete any editor changes in the future.
Of course, these header values also have a purpose currently. If at some future point we wanted pull a site down from the Engine (perhaps as a backup), the values for editable elements would be stored in these properties. Further, our original default text, which may have been lorem ipsum or some other filler, would be likewise preserved in the Liquid template.
Finishing Up
Let's commit our changes to the repository.
$ app/views/pages/about.liquid
$ git rm public/images/gyeongbokgung-full.jpg
$ git add public/samples
$ git commit -m "Made about.liquid editable through the back-office using editable elements."
All done. Let's move onto snippets!
Next: snippets