Wagon is a command line tool for creating LocomotiveCMS sites. Wagon has lots of great features, like site, page, and content type generators; modern development tools like HAML, SASS, Less, and CoffeeScript; and an embedded web server for previewing sites locally.


Installing Wagon on Windows
This guide will walk you through installing the LocomotiveCMS Wagon and its dependencies on Windows. Wagon's dependencies are:
Ruby veterans and experienced users may already have some or all of these dependencies installed, so you might only need to run gem install locomotivecms_wagon.
This guide was written using Windows 7, though only slight changes are necessary to perform these steps on Windows XP or Windows 8.
Step 1: Install the bitnami Ruby stack
The Ruby runtime was originally designed for Unix based systems. Further, some Ruby gems that LocomotiveCMS uses depend on Unix development libraries. For these reasons, it's best to install LocomotiveCMS's dependencies using software that creates a semi-isolated environment for them to run in.
This tutorial will use the freely available bitnami ruby stack, with which we have tested LocomotiveCMS wagon. Remarkably, the bitnami Ruby stack packages Ruby 1.9.3 and ImageMagick (among other features) in one easy to install package. Let's get started.
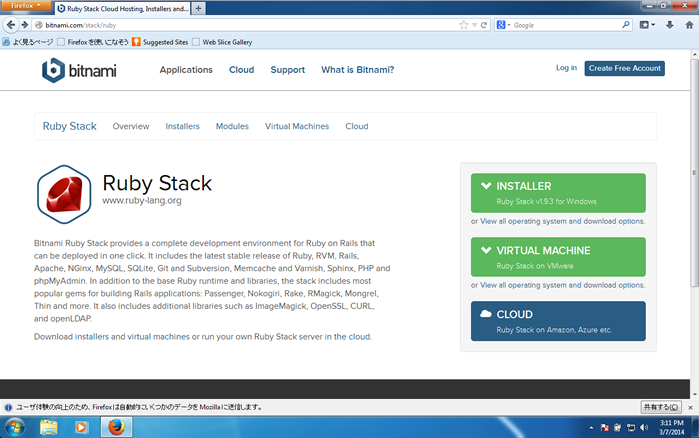
Go to http://bitnami.com/stack/ruby and download the Ruby Stack v1.9.3 installer for Windows, shown on the right. Run the installer and click through the wizard until you are presented with the option to customize your installation. Do so.
Many of the shown modules are not required by LocomotiveCMS, but you can choose to install them if you need them for other purposes. The only modules strictly required for LocomotiveCMS to work are Ruby on Rails, Apache, and DevKit. However, we highly recommend installing and trying Git if you haven't already.
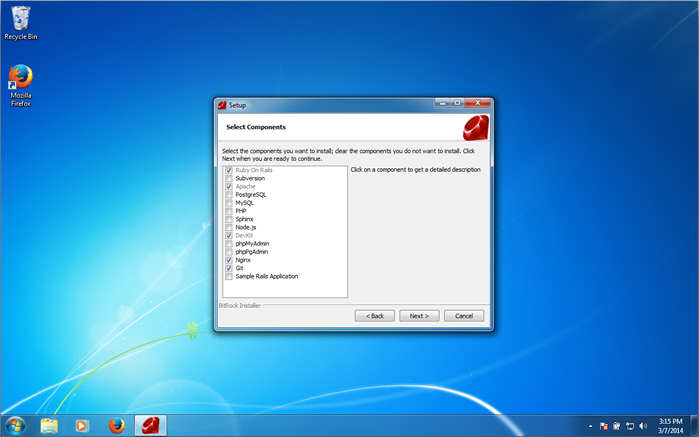
After you've selected your modules, continue clicking through the installer. We recommend that you leave the install path as is. If you change it, please note that it is important to use a path without spaces.
When asked if you would like to open Bitnami Ruby Stack in the browser, uncheck that box as we won't be using it at the moment. Click the Finish button.
Step 2: Install Bundler and Rake
From the Start Menu open All Programs / Bitnami Ruby Stack / Use Bitnami Ruby Stack. This will open a command prompt. Use the gem install command to install bundler and rake, as shown below.
C:\Bitnami\rubystack-1.9.3-22>gem install bundler
Successfully installed bundler-1.5.3
1 gem installed
Installing ri documentation for bundler-1.5.3...
Installing RDoc documentation for bundler-1.5.3...
C:\Bitnami\rubystack-1.9.3-22>gem install rake
Fetching: rake-10.1.1.gem (100%)
Successfully installed rake-10.1.1
1 gem installed
Installing ri documentation for rake-10.1.1...
Installing RDoc documentation for rake-10.1.1...
Step 3: Install LocomotiveCMS Wagon
Finally, from the same command prompt use the the gem install command to install LocomotiveCMS Wagon.
C:\Bitnami\rubystack-1.9.3-22>gem install locomotivecms_wagon
Temporarily enhancing PATH to include DevKit...
...
Installing RDoc documentation for locomotivecms_wagon-1.5.1...
The command will ouput lots of information and will take at least several minutes. Once finished, run the wagon version command to check that everything is working.
C:\Bitnami\rubystack-1.9.3-22>wagon version
1.5.1
Wagon is ready to use and you can start creating your first LocomotiveCMS site.
Installing Wagon on Mac OS X
This guide will walk you through installing the LocomotiveCMS Wagon and it's dependencies on Mac OS X. Wagon's dependencies are:
Ruby veterans and experienced users may already have some or all of these dependencies installed, so you might only need to run gem install locomotivecms_wagon.
Step 1: Install the GCC Compiler
To install dependencies like ImageMagick and Ruby, we will need the GCC compiler. The best way to install it on Mac OS X is through Xcode, which you can download for free from the Mac App Store.
Open the App Store application, search for Xcode, and click the FREE button to install it. Installing the app will require an Apple ID and password. After it installs, open Xcode, which you can find under the /Applications folder.
Upon opening Xcode you will have to agree to the license agreement and go through a dialog that installs some development tools. Once everything is installed, click the Start Using Xcode button.
Go to the Xcode -> Preferences menu and navigate to the Downloads section. At the top of the Components list, there should be a packaged called Command Line Tools; click the download icon or Install button (depeneding on your version) next to this package to install it.
Once it's done installing, the GCC compiler has been installed, so you can quit Xcode.
Step 2: Install ImageMagick
The first Wagon dependency we need to install is ImageMagick, a powerful image manipulation library. This guide will use the Mac package manger Homebrew to install ImageMagick, since it's one of the easiest ways. Alternatively, you could use another package manager such as Mac Ports or compile it from the source.
The Homebrew website provides some text that we can use to install Homebrew, also shown below.
ruby -e "$(curl -fsSL https://raw.githubusercontent.com/Homebrew/install/master/install)"
Copy this text and open the Terminal, which you can find under the /Applications/Utilties folder. Paste the above command into the Terminal and press enter to run the command. Homebrew will require your password to complete the installation.
After Homebrew installs, it is recommended that you run the brew doctor command. This will check for any potential conflicts with your system. If everything is configured correctly, the output should appear as below.
$ brew doctor
Your system is ready to brew.
We are now ready to install ImageMagick. Run the brew install imagemagick command. This command installs ImageMagick and will probably take at least several minutes to complete.
Step 3: Install Ruby
The next dependency we need is Ruby, the programming language LocomotiveCMS Wagon is written in. LocomtiveCMS requires Ruby version 1.9.3 or higher.
Mac OS 10.4 (Tiger), 10.5 (Leopard), 10.6 (Snow Leopard), 10.7 (Lion), and 10.8 (Mountain Lion) come with Ruby 1.8.x. Mac OS 10.9 (Mavericks) ships with Ruby 2.0.0.
You can confirm your ruby version, by opening a terminal shell and running the ruby -v command. The output should look similar to the output below.
$ ruby -v
ruby 1.8.7 (2012-02-08 patchlevel 358) [universal-darwin12.0]
Those with ruby version 1.9.3 or higher can skip ahead to step 4. Those with Ruby 1.8.x should continue with the steps below.
Since it's not a good idea to change the system's default Ruby, we are going to use RVM to install an additional version of Ruby. RVM is a tool that allows you to install multiple versions of Ruby on your system and switch between them.
The RVM website provides a command that we can use to intall RVM, which you can also find below.
\curl -L https://get.rvm.io | bash -s stable
Paste the command into the Terminal and click enter to install RVM. The installer's output notes that we are required to run a source command to start using RVM. Either copy the command from the Terminal output or modify the command given below to match your home directory, and run the command in the terminal shell.
source ~/.rvm/scripts/rvm
We are now ready to use RVM. Running rvm list will show what rubies are currently installed.
rvm rubies
# No rvm rubies installed yet. Try 'rvm help install'.
Run rvm list known to show all available rubies we can download.
# MRI Rubies
[ruby-]1.8.6[-p420]
[ruby-]1.8.7[-p374]
[ruby-]1.9.1[-p431]
[ruby-]1.9.2[-p320]
[ruby-]1.9.3[-p545]
[ruby-]2.0.0-p353
[ruby-]2.0.0[-p451]
[ruby-]2.1[.1]
[ruby-]2.1-head
ruby-head

# GoRuby
goruby

# Topaz
topaz

# TheCodeShop - MRI experimental patches
tcs

# jamesgolick - All around gangster
jamesgolick

# Minimalistic ruby implementation - ISO 30170:2012
mruby[-head]

# JRuby
jruby-1.6.8
jruby-1.7.6
jruby-1.7.9
jruby[-1.7.11]
jruby-head

# Rubinius
rbx-2.0.0
rbx-2.1.1
rbx[-2.2.5]
rbx-head

# Ruby Enterprise Edition
ree-1.8.6
ree[-1.8.7][-2012.02]

# Kiji
kiji

# MagLev
maglev[-head]
maglev-1.0.0

# Mac OS X Snow Leopard Or Newer
macruby-0.10
macruby-0.11
macruby[-0.12]
macruby-nightly
macruby-head

# Opal
opal

# IronRuby
ironruby[-1.1.3]
ironruby-head
Ruby 2.0.0 is listed near the top as [ruby-]2.0.0[-p451]. The brackets mean that we can optionally leave off that text when installing. Install Ruby 2.0.0 by using the following command: rvm install ruby-2.0.0. This downloads the ruby source and compiles it for your system. Once finished, check that it installed correctly by using the rvm list command.
rvm list
rvm rubies
-* ruby-2.0.0-p451 [ x86_64 ]
You can again check the current ruby version with ruby -v.
$ ruby -v
ruby 2.0.0p353 (2013-11-22 revision 43784) [x86_64-darwin12.3.0]
Step 4: Install Bundler and Rake
Wagon has two more dependencies: Bundler and Rake, both of which are ruby gems. Gems are a packaging system for Ruby. You can install gems using the gem install command, as shown below.
$ gem install bundler
Fetching: bundler-1.5.3.gem (100%)
Successfully installed bundler-1.5.3
Parsing documentation for bundler-1.5.3
Installing ri documentation for bundler-1.5.3
1 gem installed
$ gem install rake
Fetching: rake-10.1.0.gem (100%)
Successfully installed rake-10.1.0
Parsing documentation for rake-10.1.0
Installing ri documentation for rake-10.1.0
1 gem installed
Step 5: Install Wagon
Finally, we are ready to install Wagon itself. Like Bundler and Rake, wagon is a ruby gem, so we can install it by running gem install locomotivecms_wagon.
Once it finishes, check that wagon installed correctly by running the wagon version command.
$ wagon version
1.5.1
Wagon is now ready to use and you can start creating your first LocomotiveCMS site.
Installing Wagon on Linux
This guide covers installing the LocomotiveCMS Wagon and it's dependencies on Linux. Wagon's dependencies are:
We're going to assume Linux users are at least a little bit handy with the command line, so we won't do too much hand holding. Depending on your distribution, your commands may vary.
Step 1: Install ImageMagick
Wagon requires ImageMagick, so if you don't already have this, you will need to install it. You can compile it from source or use your distribution's package manager.
Sample commands to install ImageMagick with the Ubuntu and Fedora package managers are shown below.
- Ubuntu:
sudo apt-get install imagemagick - Fedora:
sudo yum install ImageMagick
Step 2: Install Ruby
Wagon is written in Ruby and requires version 1.9.3 or higher. Run the ruby -v command to see what version of ruby you have, if any.
If it's installed, you should get output similar to what is shown below. Those with ruby version 1.9.3 or higher can skip ahead to the next section.
$ ruby -v
ruby 1.9.3p194 (2012-04-20 revision 35410) [x86_64-linux]
If it's not installed, your output might look similar to the output below.
$ ruby -v
bash: ruby: command not found...
If Ruby is not installed, you can install Ruby using your distribution's package manager. The latest versions of most distributions offer ruby version 1.9.3 or higher. Sample commands for installing on Ubuntu and Fedora:
- Ubuntu:
sudo apt-get install ruby - Fedora:
sudo yum install ruby
If the version of ruby currently installed on your system or provided by your package manager is not 1.9.3 or higher, updating your system's ruby probably isn't a good idea. We recommend adding an additional ruby using a ruby version manager such as RVM or rbenv.
The RVM website provides a curl command you can use to intall RVM. After RVM installs, run the source command specified in the output.
$ \curl -L https://get.rvm.io | bash -s stable
RVM installs blah blah blah...
$ source /home/your_user_name/.rvm/scripts/rvm
We recommend Ruby version 2.0.0, which you can now install by running rvm install ruby-2.0.0. For more information on using RVM, see rvm usage or man rvm.
Step 3: Install Bundler and Rake
Wagon has two more dependencies: Bundler and Rake, both of which are ruby gems. Gems are a packaging system for Ruby. You can install gems using the gem install command, as shown below.
$ gem install bundler
Fetching: bundler-1.5.3.gem (100%)
Successfully installed bundler-1.5.3
Parsing documentation for bundler-1.5.3
Installing ri documentation for bundler-1.5.3
1 gem installed
$ gem install rake
Fetching: rake-10.1.1.gem (100%)
Successfully installed rake-10.1.1
Parsing documentation for rake-10.1.1
Installing ri documentation for rake-10.1.1
1 gem installed
Step 4: Install Wagon
Finally, we are ready to install Wagon itself. Like Bundler and Rake, wagon is a ruby gem, so we can install it by running
$ gem install locomotivecms_wagon
Once it finishes, check that wagon installed correctly by running the wagon version command.
$ wagon version
1.5.1
Wagon is now ready to use and you can start creating your first LocomotiveCMS site.