LocomotiveCMS Engine is the Ruby on Rails engine used to serve LocomotiveCMS sites in production. In most cases, site development is done with Wagon and pushed to a production LocomotiveCMS Engine that serves the site to the world wide web. But you may wish to setup Engine on your local machine for testing purposes. The instructions below guide you through installing Engine on your local development machine. These guides assumed that you have already installed Wagon.


Installing Engine on Windows
The LocomotiveCMS Engine has four main dependences.
- ImageMagick
- Ruby 1.9.3 or higher
- Ruby on Rails 3.2.x
- MongoDB
The good news is that when you installed Wagon, you already took care of installing the first three. That leaves just mongoDB. Let's get started
Step 1: Installing mongoDB
Visit the mongoDB downloads page and download the appropriate Windows binary for your computer. A 64-bit binary won't work on 32-bit computers and vice-versa, so be sure to select the correct version. If you unsure of your OS architecture, open a new Command Prompt (found in the Start Menu under All Programs \ Accessories) and enter the command below.
C:\Users\your_name> wmic os get osarchitecture
OSArchitecture
32-bit
MongoDB doesn't have an installation wizard; the binaries can simply be extracted to the specified directory. Once downloaded, extract the zip file to a path of your choice. All files within in the zip are already under a folder named by the version you downloaded. So if you downloaded the 32-bit version and extracted the archive, to C:\, then mongoDB would be installed to C:\mongodb-win32-i386-2.4.9\. This guide will assume you extract the archive to C:\.
MongoDB needs a directory to store databases in. By default, mongoDB will look for databases in C:\data\db. Let's create that directory. Open a command prompt and create the directories.
C:\Users\your_name> cd \
C:\>md data\db
If you would like to store your database under a different directory, consult the mongoDB documentation on using the --dbpath option with mongod.
Let's start mongoDB. Run mongod.exe (Mongo Daemon) in the command prompt using the command shown below. Note that you may need to alter the command slightly depending on where you extracted mongoDB.
C:\> C:\mongodb-win32-i386-2.4.9\bin\mongod.exe

C:\mongodb-win32-i386-2.4.9\bin\mongod.exe --help for help and startup options
Tue Mar 04 13:03:04.531
Tue Mar 04 13:03:04.531 warning: 32-bit servers don't have journaling enabled by default. Please use --journal if you want durability.
Tue Mar 04 13:03:04.531
Tue Mar 04 13:03:04.578 [initandlisten] MongoDB starting : pid=1256 port=27017 dbpath=\data\db\ 32-bit host=WIN-PU5S3A68A5F
Tue Mar 04 13:03:04.578 [initandlisten]
Tue Mar 04 13:03:04.578 [initandlisten] ** NOTE: This is a 32 bit MongoDB binary.
Tue Mar 04 13:03:04.578 [initandlisten] **       32 bit builds are limited to less than 2GB of data (or less with --journal).
Tue Mar 04 13:03:04.578 [initandlisten] **       Note that journaling defaults to off for 32 bit and is currently off.
Tue Mar 04 13:03:04.578 [initandlisten] **       See http://dochub.mongodb.org/core/32bit
Tue Mar 04 13:03:04.578 [initandlisten]
Tue Mar 04 13:03:04.578 [initandlisten] db version v2.4.9
Tue Mar 04 13:03:04.578 [initandlisten] git version: 52fe0d21959e32a5bdbecdc62057db386e4e029c
Tue Mar 04 13:03:04.578 [initandlisten] build info: windows sys.getwindowsversion(major=6, minor=0, build=6002, platform=2, service_pack='Service Pack 2') BOOST_LIB_VERSION=1_49
Tue Mar 04 13:03:04.593 [initandlisten] allocator: system
Tue Mar 04 13:03:04.593 [initandlisten] options: {}
Tue Mar 04 13:03:04.749 [initandlisten] waiting for connections on port 27017
Tue Mar 04 13:03:04.749 [websvr] admin web console waiting for connections on port 28017
MongoDB is now running and we can connect to your local mongoDB server, which runs on port 27017. You can close mongod at any time by pressing Ctrl + C. We're will need mongoDB to be running later, so leave it running and minimize the command prompt window.
Step 4: Setting up the Rails app
When we installed Wagon, we setup the bitnami Ruby stack, which includes Ruby on Rails. You should have Rails 3.2.x, but let's double check. Open a new bitnami command prompt by selecting All Programs \ Bitnami Ruby Stack \ Use Bitnami Ruby Stack from the Start Menu.
C:\Bitnami\rubystack-1.9.3-22> rails -v
Rails 3.2.19
Now change to a directory where you would like to create the Rails project that will host our LocomotiveCMS engine.
C:\Bitnami\rubystack-1.9.3-22> cd \Users\your_name\Documents
Create a new Rails project with the rails new command shown below. Change acme_cms to a name of your choosing.
C:\Users\your_name\Documents> rails _3.2.16_ new acme_cms --skip-active-record --skip-test-unit --skip-javascript --skip-bundle
We used several skip options to remove unneeded modules. These options respectively tell rails not to install ActiveRecord, unit test files, and the default JavaScript files. --skip-bundle let's Rails know not to immediately run bundle install as we will be editing our Gemfile.
Change into the newly created project directory.
C:\Users\your_name\Documents> cd acme_cms
We need to make two changes to the Gemfile.
-1- Add the following line.
gem 'locomotive_cms', '~> 2.5.6', :require => 'locomotive/engine'
-2- Add under the following line under the assets group.
gem 'compass',        '~> 0.12.7'
gem 'compass-rails',  '~> 2.0.0'
Below is a sample Gemfile with all commented out gems removed.
source 'https://rubygems.org'

gem 'rails', '3.2.19'

gem 'locomotive_cms', '~> 2.5.6', :require => 'locomotive/engine'

# Gems used only for assets and not required
# in production environments by default.
group :assets do
  gem 'compass',        '~> 0.12.7'
  gem 'compass-rails',  '~> 2.0.0'
  gem 'sass-rails',     '~> 3.2.6'
  gem 'coffee-rails',   '~> 3.2.2'
  gem 'uglifier',       '~> 2.5.1'
end
Back in the command prompt, run bundle install.
C:\Users\your_name\Documents\acme_cms> bundle install
Fetching gem metadata from https://rubygems.org/........
Fetching additional metadata from https://rubygems.org/..
Resolving dependencies...
Using rake (10.0.4)
Installing gems blah blah blah...
Your bundle is complete!
Use `bundle show [gemname]` to see where a bundled gem is installed.
The Rails app is now setup.
Step 4: Setup LocomotiveCMS
Almost done. Run bundle exec rails g locomotive:install to install the LocomotiveCMS Engine's configuration files.
C:\Users\your_name\Documents\acme_cms> bundle exec rails g locomotive:install
[deprecated] I18n.enforce_available_locales will default to true in the future. If you really want to skip validation of your locale you can set I18n.enforce_available_locales = false to avoid this message.
WARNING: unable to load the content types,
Problem:
  No configuration could be found for a session named 'default'.
Summary:
  When attempting to create the new session, Mongoid could not find a session configuration for the name: 'default'. This is necessary in order to know the host, port, and options needed to connect.
Resolution:
  Double check your mongoid.yml to make sure under the sessions key that a configuration exists for 'default'. If you have set the configuration programatically, ensure that 'default' exists in the configuration hash.
      create  config/initializers/locomotive.rb
      create  config/initializers/carrierwave.rb
      create  config/initializers/dragonfly.rb
      create  config/mongoid.yml
       route  mount Locomotive::Engine => '/locomotive', as: 'locomotive' # you can change the value of the path, by default set to "/locomotive"

      remove  public/index.html
===============================================================================

The Locomotive Engine has been correctly installed in your Rails application.

  1. Edit the main config files:

    - config/initializers/locomotive.rb
    - config/initializers/carrierwave.rb
    - config/initializers/dragonfly.rb
    - config/mongoid.yml
    - config/devise.yml
    - config/routes.rb

  2. Launch the server

    > bundle exec unicorn_rails

  3. Open your browser

    > open localhost:8080

  4. Follow the installation wizard steps

  5. Enjoy !

===============================================================================
This command has installed several configuration files and given us instructions on how to proceed. Since this is just a development Engine, we can ignore most of these instructions.
Multi-Site Installations
When setting up an Engine, you must decide if the Engine will host only a single site, or if it will host multiple LocomotiveCMS sites. If your Engine will only host a single site, skip this section. For a multisite installations, please follow the instructions below.
Domains
Even in development, multisite engines must have a dedicated, top-level domain, such as example.com. Each Locomotive site hosted on the Engine must have a subdomain of this top level domain. A site can of course also optionally have its own top level domains, but it must have a subdomain of the engine's domain.
A great way to simulate this in development is to add the domains to your computer's hosts file. Run sudo open /etc/hosts and add in the following lines.
127.0.0.1 myengine.dev
127.0.0.1 site-a.myengine.dev
127.0.0.1 site-b.myengine.dev
127.0.0.1 site-c.myengine.dev
...
Configuration
Open config/initializers/locomotive.rb and delete the line config.multi_sites = false. Next, uncomment the mulit-site configuration block and set the domain you entered in your hosts file.
config.multi_sites do |multi_sites|
  multi_sites.domain = 'myengine.dev'
  multi_sites.reserved_subdomains = %w(www admin email blog webmail mail support help site sites)
end
Your engine can now support multiple sites.
The one thing we will do is change the name of our mongoid database to avoid any potential conflicts with other LocomotiveCMS installations. Open config\mongoid.yml and change the database values, as shown in the example below.
development:
  sessions:
    default:
      database: acme_cms_development
      hosts:
        - localhost:27017
  options:
    identity_map_enabled: true

test:
  sessions:
    default:
      database: acme_cms_test
      hosts:
        - localhost:27017
  options:
    identity_map_enabled: true

production:
  sessions:
    default:
      database: acme_cms_production
      # heroku
      # uri: <%= ENV['MONGOHQ_URL'] %>
      hosts:
        - localhost:27017
  options:
    identity_map_enabled: true
Finally, we are ready to start LocomotiveCMS. Make sure mongod is still running and run the command below.
C:\Users\your_name\Documents\acme_cms> bundle exec rails server
=> Booting WEBrick
=> Rails 3.2.19 application starting in development on http://0.0.0.0:3000
=> Call with -d to detach
=> Ctrl-C to shutdown server
[2014-03-09 14:36:19] INFO  WEBrick 1.3.1
[2014-03-09 14:36:19] INFO  ruby 1.9.3 (2012-05-25) [i386-mingw32]
[2014-03-09 14:36:19] INFO  WEBrick::HTTPServer#start: pid=3224 port=3000
The Rails development server is now running on port 3000. You can close this server at any time by pressing Ctrl + C. Open your browser to http://localhost:3000.
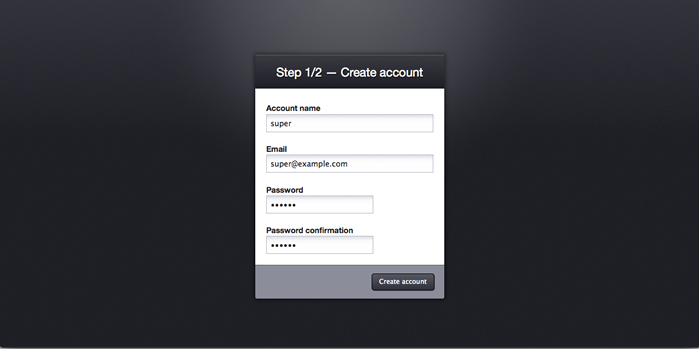
If everything is working, you should see a screen like the one above. Enter a username and password. On the next screen enter a name and locale for your first site.

After you login, go to the Settings tab and click the My Account button. You can find your API key under the Credentials section.
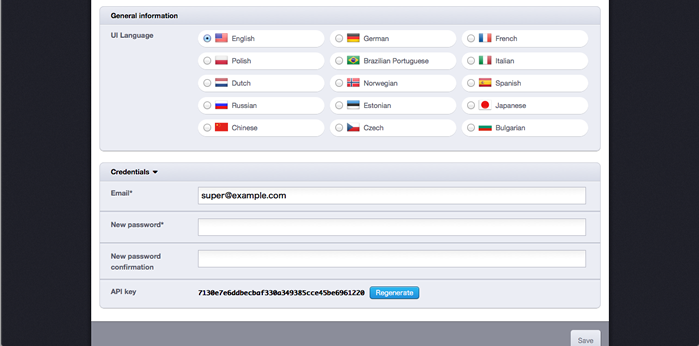
You could now push to this Engine from any Wagon site by adding the following details to your Wagon site's config/deploy.yml file (of course, substitute your own API key).
development:
  host: localhost:8080
  api_key: 7130e7e6ddbecbaf330a349385cce45be6961220
All done. You now can deploy and test your sites right from your development machine.
Installing Engine on Mac OS X
The LocomotiveCMS Engine has four main dependences.
- ImageMagick
- Ruby 1.9.3 or higher
- MongoDB
- Ruby on Rails 3.2.x
The good news is that when you installed Wagon, you already took care of installing the first two. That leaves MongoDB and Ruby on Rails 3. Let's get started.
Step 1: Installing mongoDB
The easiest way to install mongoDB on Mac OS X is with Homebrew. Fortunately, when we installed Wagon we also installed Homebrew, so you should already have this.
Open a new terminal session (you can with /Applications/Utilities/Terminal.app). Run brew update to make sure that Homebrew has the latest formulas for mongoDB. Then run brew install mongodb.
$ brew update
$ brew install mongodb
Downloading and installing mongoDB will take at least several minutes. Once it's complete, you can start mongoDB from the terminal using the mongod (Mongo Daemon) command.
$ mongod
all output going to: /usr/local/var/log/mongodb/mongo.log
MongoDB is now running and we can connect to your local mongoDB server (which runs on port 27017). You can close mongod at any time by pressing control + C. We're going to need mongoDB to be running later, so leave it running and minimize the terminal window.
Step 2: Installing Ruby on Rails 3
Ruby on Rails can installed with the gem install command. Note that LocomotiveCMS Engine requires Ruby on Rails 3, not the newer Ruby on Rails 4. Rails 4 support is coming in the next major version of LocomotiveCMS. Thus, we need the --version option to get the correct version
$ gem install rails --version=3.2.19
Fetching: multi_json-1.9.0.gem (100%)
Successfully installed multi_json-1.9.0
...blah blah blah, installing lots of gems and documentation
Parsing documentation for tzinfo-0.3.38
Installing ri documentation for tzinfo-0.3.38
28 gems installed
Step 3: Setting up the Rails app
Now that we have Rails installed, we can create a Rails app to host our LocomotiveCMS Engine using the rails new command shown below. Please substitute acme_cms with a name of your choosing.
$ rails new acme_cms --skip-active-record --skip-test-unit --skip-javascript --skip-bundle
We used several skip options to remove unneeded modules. These options respectively tell rails not to install ActiveRecord, unit test files, and the default JavaScript files. --skip-bundle let's Rails know not to immediately run bundle install as we will be editing our Gemfile.
Change into the newly created directory.
$ cd acme_cms
Open the Gemfile. We need to make three changes to the file.
-1- Add the following line.
gem 'locomotive_cms', '~> 2.5.6', :require => 'locomotive/engine'
-2- Add the following lines under the assets group.
gem 'compass',        '~> 0.12.7'
gem 'compass-rails',  '~> 2.0.0'
-3- Uncomment the following line.
gem 'unicorn'
Below is a sample Gemfile with all commented out gems removed.
source 'https://rubygems.org'

gem 'rails', '3.2.19'

gem 'locomotive_cms', '~> 2.5.6', :require => 'locomotive/engine'

# Gems used only for assets and not required
# in production environments by default.
group :assets do
  gem 'compass',        '~> 0.12.7'
  gem 'compass-rails',  '~> 2.0.0'
  gem 'sass-rails',     '~> 3.2.6'
  gem 'coffee-rails',   '~> 3.2.2'
  gem 'uglifier',       '~> 2.5.1'
end

# Use unicorn as the app server
gem 'unicorn'
Back in the terminal, run bundle install.
$ bundle install
Fetching gem metadata from https://rubygems.org/........
Fetching additional metadata from https://rubygems.org/..
Resolving dependencies...
Using rake (10.0.4)
Installing gems blah blah blah...
Your bundle is complete!
Use `bundle show [gemname]` to see where a bundled gem is installed.
Great. Rails is now setup.
Step 4: Setup LocomotiveCMS
Almost done. Run bundle exec rails g locomotive:install to install the LocomotiveCMS Engine's configuration files.
$ bundle exec rails g locomotive:install
[deprecated] I18n.enforce_available_locales will default to true in the future. If you really want to skip validation of your locale you can set I18n.enforce_available_locales = false to avoid this message.
WARNING: unable to load the content types,
Problem:
  No configuration could be found for a session named 'default'.
Summary:
  When attempting to create the new session, Mongoid could not find a session configuration for the name: 'default'. This is necessary in order to know the host, port, and options needed to connect.
Resolution:
  Double check your mongoid.yml to make sure under the sessions key that a configuration exists for 'default'. If you have set the configuration programatically, ensure that 'default' exists in the configuration hash.
      create  config/initializers/locomotive.rb
      create  config/initializers/carrierwave.rb
      create  config/initializers/dragonfly.rb
      create  config/mongoid.yml
       route  mount Locomotive::Engine => '/locomotive', as: 'locomotive' # you can change the value of the path, by default set to "/locomotive"

      remove  public/index.html
===============================================================================

The Locomotive Engine has been correctly installed in your Rails application.

  1. Edit the main config files:

    - config/initializers/locomotive.rb
    - config/initializers/carrierwave.rb
    - config/initializers/dragonfly.rb
    - config/mongoid.yml
    - config/devise.yml
    - config/routes.rb

  2. Launch the server

    > bundle exec unicorn_rails

  3. Open your browser

    > open localhost:8080

  4. Follow the installation wizard steps

  5. Enjoy !

===============================================================================
This command has installed several configuration files and given us instructions on how to proceed. Since this is just a development engine, we will skip most of these instructions.
But to avoid any potential conflicts with other LocomotiveCMS installations, let's change the name of our mongoid databases in config/mongoid.yml, as shown in the example below.
development:
  sessions:
    default:
      database: acme_cms_development
      hosts:
        - localhost:27017
  options:
    identity_map_enabled: true

test:
  sessions:
    default:
      database: acme_cms_test
      hosts:
        - localhost:27017
  options:
    identity_map_enabled: true

production:
  sessions:
    default:
      database: acme_cms_production
      # heroku
      # uri: <%= ENV['MONGOHQ_URL'] %>
      hosts:
        - localhost:27017
  options:
    identity_map_enabled: true
Finally, we are ready to start LocomotiveCMS. Make sure mongod is still running and run the command below.
$ bundle exec unicorn_rails
I, [2014-03-08T13:42:51.416116 #6966]  INFO -- : listening on addr=0.0.0.0:8080 fd=9
I, [2014-03-08T13:42:51.416263 #6966]  INFO -- : worker=0 spawning...
I, [2014-03-08T13:42:51.417907 #6966]  INFO -- : master process ready
I, [2014-03-08T13:42:51.419029 #6967]  INFO -- : worker=0 spawned pid=6967
I, [2014-03-08T13:42:51.419540 #6967]  INFO -- : Refreshing Gem list
I, [2014-03-08T13:42:55.505952 #6967]  INFO -- : worker=0 ready
The unicorn server is now serving our Rails app. You can stop the unicorn server at any time by sending the interrupt signal with control + C. Open your browser to http://localhost:8080.
If everything is working, you should see a screen like the one above. Enter a username and password. On the next screen enter a name and locale for your first site.
After you login, go to the Settings tab and click the My Account button. You can find your API key under the Credentials section.
You could now push to this Engine from any Wagon site by adding the following details to your Wagon site's config/deploy.yml file (of course, substitute your own API key).
development:
  host: localhost:8080
  api_key: 7130e7e6ddbecbaf330a349385cce45be6961220
All done. You now can deploy and test your sites right from your development machine.
Installing Engine on Linux
The LocomotiveCMS Engine has four main dependencies.
- ImageMagick
- Ruby 1.9.3 or higher
- MongoDB
- Ruby on Rails 3.2.x
The good news is that when you installed Wagon, you already took care of installing the first two. That leaves MongoDB and Ruby on Rails 3. Let's get started.
You're a Linux user, so we're going to assume you're fairly handy with the command line and do this with a minimum of hand holding.
Step 1: Installing mongoDB
MongoDB installation is easy. Visit the mongoDB's guide to installing on Linux, select your distribution, and follow the instructions. We recommend reading the guide yourself, but you can find a summary below.
For Fedora:
yum install mongo-10gen mongo-10gen-server
For Ubuntu:
sudo apt-key adv --keyserver hkp://keyserver.ubuntu.com:80 --recv 7F0CEB10
echo 'deb http://downloads-distro.mongodb.org/repo/ubuntu-upstart dist 10gen' | sudo tee /etc/apt/sources.list.d/mongodb.list
sudo apt-get update
sudo apt-get install mongodb-10gen
Once installed, open a new terminal and run the mongod command to start mongoDB.
$ mongod
all output going to: /usr/local/var/log/mongodb/mongo.log
MongoDB is now running and we can connect to the local mongoDB server (which runs on port 27017). You can close mongod at any time by pressing control + C. We're going to need mongoDB to be running later, so leave it running and minimize the terminal window.
Step 2: Installing Ruby on Rails 3
Ruby on Rails can be installed with the gem install command. Note that LocomotiveCMS Engine requires Ruby on Rails 3, not the newer Ruby on Rails 4. Rails 4 support is coming in the next major version of LocomotiveCMS. Thus, we need the --version option to get the correct version
$ gem install rails --version=3.2.19
Fetching: multi_json-1.9.0.gem (100%)
Successfully installed multi_json-1.9.0
...blah blah blah, installing lots of gems and documentation
Parsing documentation for tzinfo-0.3.38
Installing ri documentation for tzinfo-0.3.38
28 gems installed
Step 3: Setting up the Rails app
Now that we have Rails installed, create a Rails app to host our LocomotiveCMS Engine using the rails new command shown below. Please substitute acme_cms with a name of your choosing.
$ rails new acme_cms --skip-active-record --skip-test-unit --skip-javascript --skip-bundle
We used several skip options to remove unneeded modules. These options respectively tell rails not to install ActiveRecord, unit test files, and the default JavaScript files. --skip-bundle let's Rails know not to immediately run bundle install as we will be editing our Gemfile.
Change into the newly created project directory.
$ cd acme_cms
We need to make four changes to the Gemfile.
-1- Add the following line.
gem 'locomotive_cms', '~> 2.5.6', :require => 'locomotive/engine'
-2- Add the following line under the assets group.
gem 'compass',        '~> 0.12.7'
gem 'compass-rails',  '~> 2.0.0'
-3- Uncomment the following line under the assets group.
gem 'therubyracer', :platforms => :ruby
-4- Uncomment the following line.
gem 'unicorn'
Below is a sample Gemfile with all commented out gems removed.
source 'https://rubygems.org'

gem 'rails', '3.2.19'

gem 'locomotive_cms', '~> 2.5.6', :require => 'locomotive/engine'

# Gems used only for assets and not required
# in production environments by default.
group :assets do
  gem 'compass',        '~> 0.12.7'
  gem 'compass-rails',  '~> 2.0.0'
  gem 'sass-rails',     '~> 3.2.6'
  gem 'coffee-rails',   '~> 3.2.2'
  gem 'uglifier',       '~> 2.5.1'
  gem 'therubyracer', :platforms => :ruby
end

# Use unicorn as the app server
gem 'unicorn'
Back in the terminal, run bundle install.
$ bundle install
Fetching gem metadata from https://rubygems.org/........
Fetching additional metadata from https://rubygems.org/..
Resolving dependencies...
Using rake (10.0.4)
Installing gems blah blah blah...
Your bundle is complete!
Use `bundle show [gemname]` to see where a bundled gem is installed.
Rails is now setup.
Step 4: Setup LocomotiveCMS
Almost done. Run bundle exec rails g locomotive:install to install the LocomotiveCMS Engine's configuration files.
$ bundle exec rails g locomotive:install
[deprecated] I18n.enforce_available_locales will default to true in the future. If you really want to skip validation of your locale you can set I18n.enforce_available_locales = false to avoid this message.
WARNING: unable to load the content types,
Problem:
  No configuration could be found for a session named 'default'.
Summary:
  When attempting to create the new session, Mongoid could not find a session configuration for the name: 'default'. This is necessary in order to know the host, port, and options needed to connect.
Resolution:
  Double check your mongoid.yml to make sure under the sessions key that a configuration exists for 'default'. If you have set the configuration programatically, ensure that 'default' exists in the configuration hash.
      create  config/initializers/locomotive.rb
      create  config/initializers/carrierwave.rb
      create  config/initializers/dragonfly.rb
      create  config/mongoid.yml
       route  mount Locomotive::Engine => '/locomotive', as: 'locomotive' # you can change the value of the path, by default set to "/locomotive"

      remove  public/index.html
===============================================================================

The Locomotive Engine has been correctly installed in your Rails application.

  1. Edit the main config files:

    - config/initializers/locomotive.rb
    - config/initializers/carrierwave.rb
    - config/initializers/dragonfly.rb
    - config/mongoid.yml
    - config/devise.yml
    - config/routes.rb

  2. Launch the server

    > bundle exec unicorn_rails

  3. Open your browser

    > open localhost:8080

  4. Follow the installation wizard steps

  5. Enjoy !

===============================================================================
This command has installed several configuration files and given us instructions on how to proceed. Since this is just a development Engine, we can ignore most of these instructions.
Multi-Site Installations
When setting up an Engine, you must decide if the Engine will host only a single site, or if it will host multiple LocomotiveCMS sites. If your Engine will only host a single site, skip this section. For a multisite installations, please follow the instructions below.
Domains
Even in development, multisite engines must have a dedicated, top-level domain, such as example.com. Each Locomotive site hosted on the Engine must have a subdomain of this top level domain. A site can of course also optionally have its own top level domains, but it must have a subdomain of the engine's domain.
A great way to simulate this in development is to add the domains to your computer's hosts file. Run sudo nano /etc/hosts and add in the following lines.
127.0.0.1 myengine.dev
127.0.0.1 site-a.myengine.dev
127.0.0.1 site-b.myengine.dev
127.0.0.1 site-c.myengine.dev
...
Configuration
Open config/initializers/locomotive.rb and delete the line config.multi_sites = false. Next, uncomment the mulit-site configuration block and set the domain you entered in your hosts file.
config.multi_sites do |multi_sites|
  multi_sites.domain = 'myengine.dev'
  multi_sites.reserved_subdomains = %w(www admin email blog webmail mail support help site sites)
end
Your engine can now support multiple sites.
However, to avoid any potential conflicts with other LocomotiveCMS installations, let's change the name of our mongoid databases in config/mongoid.yml, as shown in the example below.
development:
  sessions:
    default:
      database: acme_cms_development
      hosts:
        - localhost:27017
  options:
    identity_map_enabled: true

test:
  sessions:
    default:
      database: acme_cms_test
      hosts:
        - localhost:27017
  options:
    identity_map_enabled: true

production:
  sessions:
    default:
      database: acme_cms_production
      # heroku
      # uri: <%= ENV['MONGOHQ_URL'] %>
      hosts:
        - localhost:27017
  options:
    identity_map_enabled: true
Finally, we are ready to start LocomotiveCMS. Make sure mongod is still running and run the command below.
$ bundle exec unicorn_rails
I, [2014-03-08T13:42:51.416116 #6966]  INFO -- : listening on addr=0.0.0.0:8080 fd=9
I, [2014-03-08T13:42:51.416263 #6966]  INFO -- : worker=0 spawning...
I, [2014-03-08T13:42:51.417907 #6966]  INFO -- : master process ready
I, [2014-03-08T13:42:51.419029 #6967]  INFO -- : worker=0 spawned pid=6967
I, [2014-03-08T13:42:51.419540 #6967]  INFO -- : Refreshing Gem list
I, [2014-03-08T13:42:55.505952 #6967]  INFO -- : worker=0 ready
The unicorn server is now serving our Rails app. You can stop the unicorn server at any time by sending the interrupt signal with Ctrl + C. Open your browser to http://localhost:8080.
If everything is working, you should see a screen like the one above. Enter a username and password. On the next screen enter a name and locale for your first site.
After you login, go to the Settings tab and click the My Account button. You can find your API key under the Credentials section.
You could now push to this Engine from any Wagon site by adding the following details to your Wagon site's config/deploy.yml file (of course, substitute your own API key).
development:
  host: localhost:8080
  api_key: 7130e7e6ddbecbaf330a349385cce45be6961220
All done. You now can deploy and test your sites right from your development machine.